Affiliate Disclosure: To keep this project independent and free of monthly monitoring subscriptions, every product and method listed here is based on what actually works in the field. As an Amazon Associate, I earn from qualifying purchases. This helps support the maintenance of these guides.
If you’ve landed here looking for a real Honeywell Vista 20P programming guide—not a watered-down overview or a sales pitch for a cloud-based replacement—you’re in the right place. This is the hub resource built from 31 years in the trades, written for homeowners, engineers, and serious DIYers who want a security system that is hardwired, local-first, and built to outlast every subscription-based gadget on the market.
The Honeywell VISTA-20P is not a legacy relic. It is the most field-proven, contractor-grade residential control panel ever manufactured, and when programmed correctly, it forms the backbone of a fully integrated smart home that you own outright—no monthly fees, no cloud ransom, no expiration date.
Achieving this flawless level of local automation requires executing the initial configuration sequences with absolute systematic precision, which is why following a dedicated Honeywell Vista 20P Programming Guide is essential to mapping your zones, setting up your entry delays, and linking your physical security field hardware to your local network infrastructure without error.
Why the Vista 20P Still Dominates Residential Security
The residential security market has been flooded with Wi-Fi cameras, plastic hubs, and app-dependent alarm kits that become paperweights the moment a company pivots its business model. That cycle repeats itself over and over. By stepping away from these volatile consumer ecosystems and consulting a rigorous Honeywell Vista 20P Programming Guide, you can take complete command of your own residential security deployment using stable, professional-grade methods that never expire.
The Vista 20P survives every trend because it was engineered on fundamentals that don’t change: hardwired zones, a dedicated communication bus, a proven programming structure, and long-term durability baked into every component. While the physical iron of the panel remains virtually indestructible, navigating its complex hexadecimal menus requires an organized Honeywell Vista 20P Programming Guide to ensure your custom installer codes, system response rates, and zone definitions are locked in exactly right from day one.
It supports up to 48 zones, handles both wired and wireless sensors on the same platform, integrates with commercial-grade keypads like the 6160RF, and communicates through IP bridges like the Envisalink 4 to connect to modern smart home ecosystems without surrendering local control. Unlocking this full hardware capacity requires a systematic blueprint to program the field expansion attributes, making a dedicated Honeywell Vista 20P Programming Guide the essential bridge between raw hardware assembly and automated, zero-latency network communication.
From a diagnostic approach standpoint, the Vista 20P’s architecture is transparent. Every zone, every output relay, every communication path is addressable and testable at the panel level. That kind of structural clarity is what separates contractor-grade hardware from consumer-grade plastic—and it’s exactly why this system is the foundation of every integrated home build documented on this site. Merging this transparent physical design with a comprehensive Honeywell Vista 20P Programming Guide gives you an unshakeable roadmap to verify your wiring logic, clear system faults with total confidence, and build a security layer that lasts for decades.
Honeywell Vista 20P Parts: The Core Hardware Stack
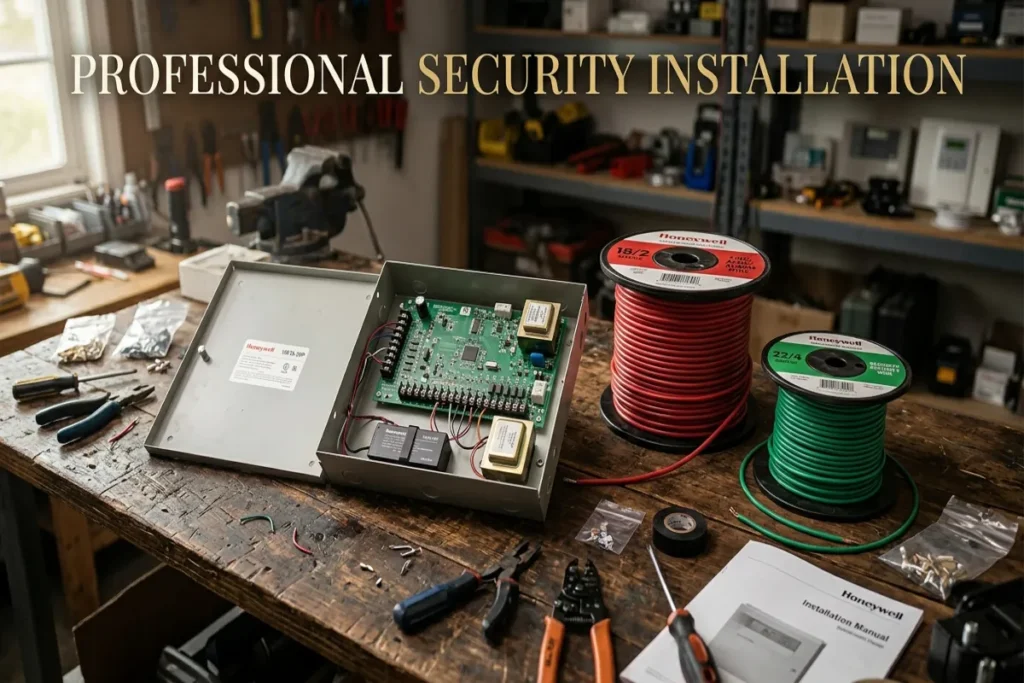
Before a single line of programming is entered, the physical hardware has to be right. Sloppy honeywell-vista-20p-parts selection is the number one reason DIY installs fail at the panel level. Here is the baseline component stack used in a proper residential deployment:
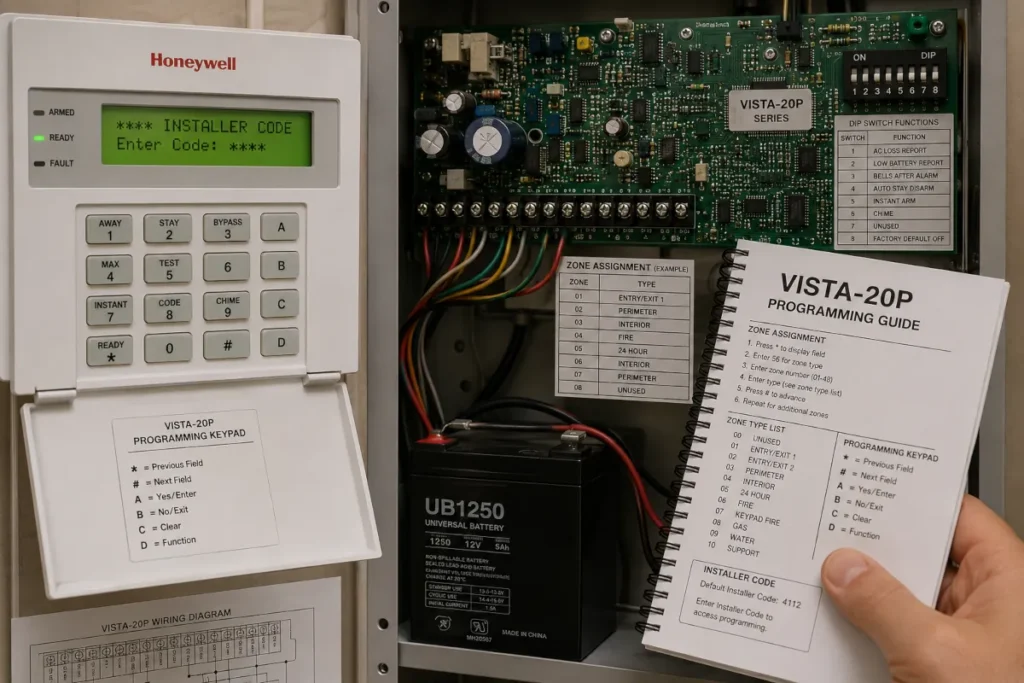
- Vista 20P Main Board: The Honeywell VISTA-20P control panel — the core processor, zone terminals, and output relays. This is the non-negotiable anchor of the entire system. Accessing its underlying architecture requires a dedicated Honeywell Vista 20P Programming Guide to ensure your hexadecimal fields match your local security zone layout.
- Keypad — 6160RF: The alpha-numeric keypad with integrated RF receiver. This single unit handles both hardwired zone programming feedback and wireless sensor enrollment, eliminating the need for a separate RF module in most residential builds. Using an accurate Honeywell Vista 20P Programming Guide allows you to properly input alpha descriptors and navigate data fields cleanly from this primary station.
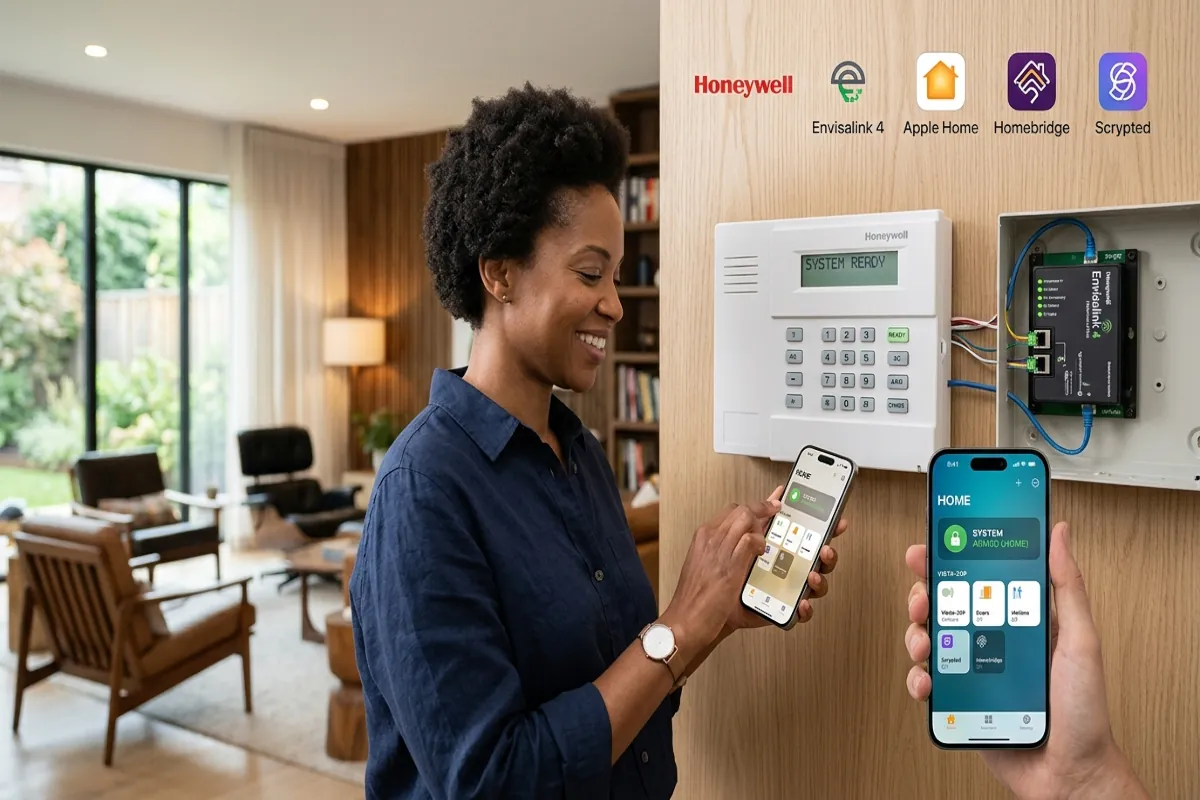
- Envisalink 4 IP Module: The IP-to-panel bridge that connects the Vista 20P to your local network via the ECP (Enhanced Communication Protocol) bus. This is the “Silicon” bridge that enables Homebridge, Scrypted, and Apple Home integration without any cloud dependency. Reviewing a detailed Honeywell Vista 20P Programming Guide ensures your panel’s communicator and reporting codes are precisely set up to broadcast data over this network gateway.
- 12V 7Ah Backup Battery: Hardwired into the panel for continuous operation during power outages. Spec a sealed lead-acid unit rated for the panel’s standby current draw. Replace on a 3-to-5-year preventative maintenance schedule. Keeping a comprehensive Honeywell Vista 20P Programming Guide handy helps you clear the low battery faults and system resets that occur during routine power maintenance logs.
- 18/2 Stranded Wire: The field standard for siren runs, and auxiliary power drops. Never substitute solid-core wire on a bus run — stranded handles vibration and repeated flex without fatigue failure. Referencing a professional Honeywell Vista 20P Programming Guide will help you map out your power supervisions and verify that the physical terminals line up perfectly with your programmed output relays.
- 22/4 Stranded Wire: The correct spec for keypad bus wiring, door and window contact loops and passive PIR motion detector wiring. Four conductors cover your zone pair and your tamper loop simultaneously. Consulting an established Honeywell Vista 20P Programming Guide ensures that these physical conductor paths match the specific zone responses and loop configurations you apply in the software.
- Plug-In Transformer (16.5VAC, 40VA): The dedicated AC power source for the panel. Do not share this circuit with high-draw appliances. A clean, dedicated outlet is part of proper installation prep. An authorized Honeywell Vista 20P Programming Guide will provide the step-by-step diagnostic sequence to power down the system safely via AC disconnect before modifying any sensitive core internal configurations.
The Honeywell Vista 20P Programming Guide: Zone Configuration Deep Dive
Programming the Vista 20P is not guesswork. It is a structured, sequential process governed by the panel’s installer programming mode — accessed by entering the default installer code (4112) followed by 800 at a 6160-series keypad.
Every parameter in the system lives inside a numbered data field. Understanding the field structure is the foundation of real-world troubleshooting on this platform.
Navigating these numeric fields systematically requires keeping a definitive Honeywell Vista 20P Programming Guide right at your workbench, ensuring you can cross-reference field codes, entry parameters, and memory values without losing your place in the sequence.
Zone Definition: The Logic and Loops Framework
Every physical sensor — door contact, window contact, PIR motion detector, glassbreak detector, smoke detector — occupies a numbered zone on the panel. Zones 1 through 8 are hardwired directly to the terminal strip on the main board.
Zones 9 and above are expanded via the ECP bus using zone expander modules, or enrolled wirelessly through the 6160RF’s integrated receiver. Each zone is defined by three critical programming parameters:
To map these parameters accurately across your layout, relying on a comprehensive Honeywell Vista 20P Programming Guide is essential to prevent conflicting loop assignments and ensure your hardware expansions report cleanly back to the core processor:
- Zone Type (Field *56): Defines how the panel responds to a trip on that zone. Common types include Zone Type 01 (Entry/Exit Delay), Zone Type 03 (Perimeter — instant alarm), Zone Type 04 (Interior Follower), Zone Type 05 (Trouble by Day/Alarm by Night), and Zone Type 08 (24-Hour Auxiliary — for smoke and CO detectors).
- Zone Partition Assignment (Field *56 sub-field): Assigns the zone to Partition 1, Partition 2, or both. In a single-family residential build, most zones live on Partition 1. Partition 2 is typically reserved for a secondary structure like a detached garage or workshop.
- Zone Response Time: Hardwired zones respond in under 400 milliseconds. Wireless zones have a polling delay built into the RF protocol — typically 30 to 90 seconds for supervisory check-ins — which must be accounted for in your alarm response logic.
Output Programming: Relays, Sirens, and Auxiliary Devices
The Vista 20P provides two onboard programmable output relays (PGM terminals) and supports additional relay modules on the ECP bus. Proper layout math on output wiring prevents the most common field failure: a siren that triggers on the wrong event or an auxiliary device that latches when it should pulse.
Output programming is handled in Field *79 through *83, where each relay is assigned a trigger event (alarm, trouble, system armed, zone fault) and a response type (steady, pulsed, or latched). Mapping out these complex logic paths requires consulting an accurate Honeywell Vista 20P Programming Guide to ensure your relay numbers, action codes, and start/stop conditions are meticulously defined in the system memory.
For a standard residential siren run: wire the bell output terminals to a self-contained outdoor siren using 18/2 stranded wire, keeping the run under 500 feet to avoid voltage drop that degrades trigger response. The panel’s bell output is rated at 700mA — sufficient for a single piezo siren. If you’re running dual sirens or a siren with an integrated strobe, add a relay module to avoid overloading the onboard output.
Keeping an established Honeywell Vista 20P Programming Guide at your workbench ensures you can cleanly configure the exact pulse and steady attributes needed to drive external power supplies safely without overdriving the panel’s built-in circuits.
Integrating the Vista 20P with Apple Home via Homebridge and Scrypted
This is where the Vista 20P transitions from a legacy alarm panel into the nerve center of a fully integrated smart home — and it does it without surrendering a single byte of data to a third-party cloud. The integration stack is straightforward once the Envisalink 4 is online and communicating on the ECP bus.
Envisalink 4 to Homebridge: The Local Network Bridge
The Envisalink 4 module connects to the Vista 20P’s ECP data bus using a standard 4-conductor connection: Red (12V+), Black (Ground), Yellow (Data), Green (Clock). Once powered and connected to your home router via Ethernet — always Ethernet, never Wi-Fi for a security-critical device — the Envisalink hosts a local API that the homebridge-envisalink plugin reads in real time.
From Homebridge, every armed partition and every zone trips as a native sensor or security system tile inside Apple Home. This is a fully local, zero-subscription integration. Your panel data never leaves your network.
Live Camera Integration via Scrypted in Apple Home
Scrypted is the bridge that brings live video into Apple Home’s native interface without requiring HomeKit Secure Video subscriptions or third-party NVR apps. Running Scrypted on a Synology NAS — a dedicated Mac Mini, a Raspberry Pi 5, or an Intel NUC — it translates RTSP camera streams from compatible IP cameras into HomeKit-compatible feeds.
When a Vista 20P zone trips, an Apple Home automation can trigger a camera snapshot or live view instantly. That is a complete, contractor-grade security ecosystem: hardwired panel, local IP bridge, and live video — all operating inside your own network vault.
Establishing Low-Voltage Power and Panel Grounding Standards
Before entering the panel programming sequences, you must ensure the structural foundation of your system meets commercial-grade electrical and communication requirements. A legacy hardwired board like the VISTA-20P relies entirely on clean, low-voltage AC power and a solid earth ground to prevent false alarms, protect zone resistors, and shield your network expansion modules from voltage spikes.
Run your 18/2 stranded wire from a standard 16.5VAC, 25VA transformer directly to terminals 1 and 2, ensuring you never share an unswitched outlet with high-draw appliances. Furthermore, you must run a solid copper grounding wire from terminal 4 directly to your home’s primary electrical grounding rod or a cold water pipe according to low-voltage safety parameters.
To verify that your physical layout, wire runs, and backup battery enclosures comply with national residential fire and safety regulations, you can reference the official low-voltage equipment standards maintained by the National Fire Protection Association before buttoning up your enclosure sheet metal.
Preventative Maintenance Schedule for the Vista 20P System
Preventative maintenance is not optional on a hardwired security system — it is the difference between a panel that performs flawlessly for 20 years and one that generates nuisance faults at 3 AM. Field-tested maintenance intervals for a residential Vista 20P installation are as follows:
- Every 6 Months: Walk every zone. Open every door contact, trip every motion detector, and verify the keypad logs the correct zone number and descriptor. A zone that fails to trip during a walk test is a failed zone — not a false alarm risk, but a security gap.
- Every 12 Months: Load-test the backup battery. Using a battery load tester, verify the 12V 7Ah unit holds voltage above 11.8V under a 3A load for 30 seconds. A battery that drops below 11.5V under load is at end-of-life and must be replaced before the next power outage.
- Every 3–5 Years: Replace the backup battery on a scheduled basis regardless of load-test results. Sealed lead-acid chemistry degrades on a predictable curve — scheduled replacement is cheaper than an emergency call after a storm.
- Annually: Inspect all terminal block connections for oxidation, especially in high-humidity environments. A corroded screw terminal on a zone input creates a high-resistance fault that mimics a wiring problem. Clean with a brass brush and apply a thin coat of electrical contact grease.
- Annually: Verify Envisalink firmware is current. Envisalink releases firmware updates that address communication stability and API compatibility. An outdated firmware version is the most common cause of Homebridge plugin disconnects.
The Field Manual: Programming Reference Quick-Index
This section serves as the rapid-access index for the most-referenced programming fields in a standard Vista 20P residential configuration. Full step-by-step breakdowns for each field are covered in the dedicated support posts linked below.
- Field *20 — First Phone Number: Central station or self-monitoring reporting number. Enter in installer mode. Leave blank for a fully local, non-reporting configuration.
- Field *56 — Zone Programming: The master zone definition field. Zone type, partition assignment, and alarm response are all set here. This is the most-visited field in any Vista 20P installation.
- Field *57 — Zone Descriptor: Assigns a plain-language name (e.g., “FRONT DOOR,” “GARAGE MOTION”) to each zone number. These descriptors appear on the alpha keypad display during a fault or alarm event.
- Field *58 — Access Codes: Programs user codes 2 through 32. User Code 1 is the master code. Codes can be assigned authority levels — arm only, full access, or guest access — giving granular control over who can disarm the system.
- Field *79–*83 — Output (Relay) Programming: Defines trigger events and response behavior for the PGM relay outputs. Essential for integrating auxiliary devices, strobes, or smart home relay triggers.
- Field *91 — Communication Format: Sets the reporting protocol for central station communication. For a local-only build using Envisalink, this field is set to disable outbound dialer communication entirely.
The Book Behind the Blueprint is Coming Soon
Every technique, field sequence, and integration method documented on this site is drawn directly from the field manual I wrote for homeowners and serious DIYers who want the full picture in one place. THE VISTA-20P WORKHORSE: The Field Guide to Modernizing Your Honeywell Security System is the complete paperback resource — covering panel installation, zone programming,
Envisalink integration, Homebridge setup, Scrypted live video, and the full preventative maintenance protocol. It is the book I wished existed when I started applying Builder’s Logic to my own home. If this hub page is the map, the book is the territory.
The complete paperback field manual will be available soon on Amazon, giving you a physical blueprint to keep right beside your panel enclosure. Pick up your copy, mark up the custom wiring diagrams, build a home automation framework that lasts, and pass the volume along to the next homeowner as an essential piece of the house’s legacy documentation.
Contact & Technical Questions
If you have technical questions regarding the schematics, programming fields, or hardware covered in these guides, reach out directly:
- Email: david@cdavidchase.com
- Technical Line: 865-226-9721
Every field sequence, wiring spec, and integration method documented across this site is backed by 31 years of production-scale contracting work and hands-on experience diagnosing residential security systems from the panel board out. This is not theoretical guidance pulled from a manufacturer’s PDF. It is the same diagnostic approach and field-tested methods applied to thousands of real installations — distilled into a format that any serious homeowner or DIYer can execute with confidence. Build it right. Build it once. Build it to last.
Nailing down the exact programming sequences for a legacy hardwired system requires patience, precision, and an absolute adherence to systematic diagnostics. In my 31 years of active field work in the contracting and construction trades, I have learned that even the most advanced smart home automation script will fall completely flat if it is riding on faulty, mismatched, or degraded physical hardware components.
Before you secure your enclosure door and transition your system into production mode, you must ensure every expansion board, resistor value, and wiring interface meets strict commercial-grade criteria.
To audit your physical layout against a complete inventory of compatible, field-tested components, head over to our comprehensive Honeywell Vista-20P Parts field guide to verify your master tool kit, protect your structural integrity, and guarantee long-term system durability.
To maintain the independence of this project and keep these guides free of corporate sponsorship, cdavidchase.com participates in the Amazon Services LLC Associates Program.
As an Amazon Associate, I earn from qualifying purchases at no extra cost to you.